How to Alter Colors in Photoshop: A Complete Step-by-Step Tutorial
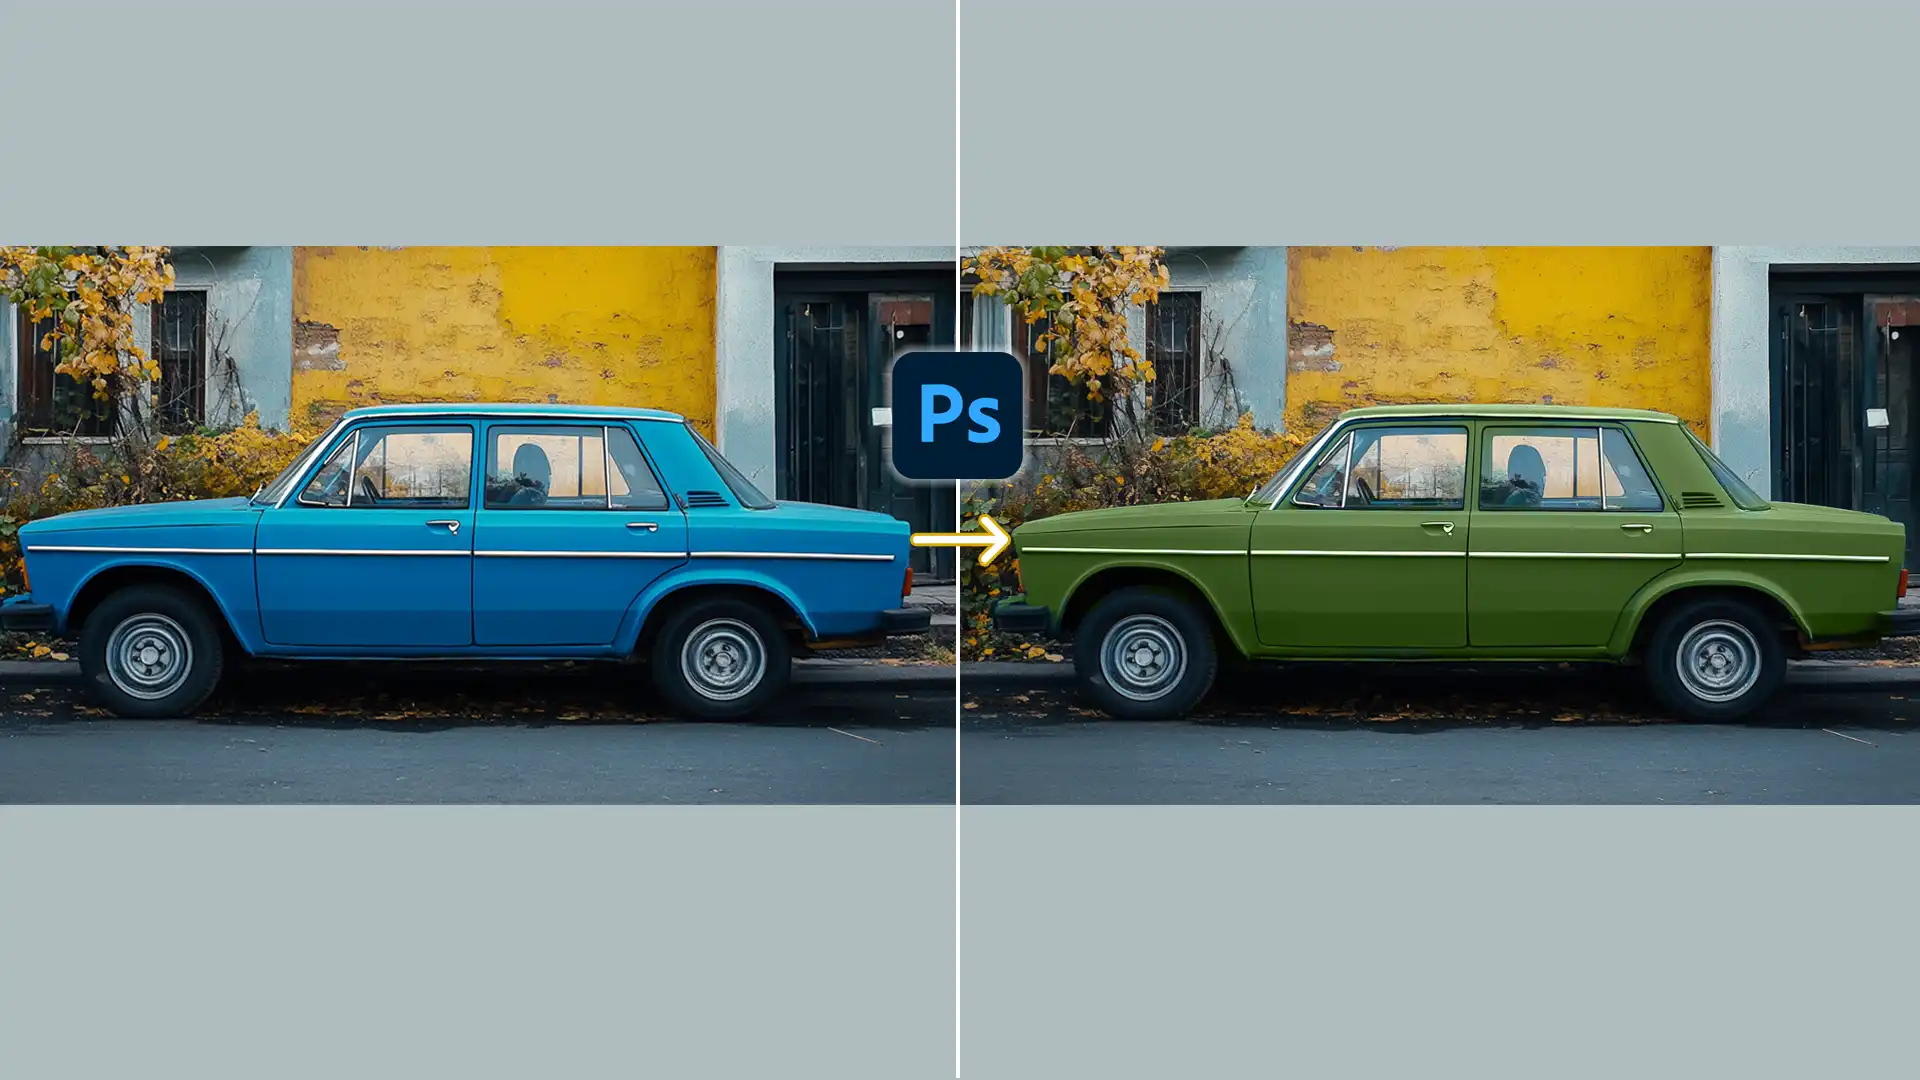
How to Alter Colors in Photoshop
Before adjusting colors, it’s important to understand color modes. Adobe Photoshop provides modes such as RGB and CMYK.
- RGB (Red, Green, Blue) is best for digital images.
- CMYK (Cyan, Magenta, Yellow, Black) is designed for print.
Choose the appropriate mode depending on the intended use of your project. Making the right choice greatly influences the final image quality.
Pro Tip: Discover how to change DPI in Photoshop for high-quality prints.
Also, make sure to understand what “pixels per inch” means for print to avoid any issues after completing your edits.
Using the Replace Color Tool in Photoshop
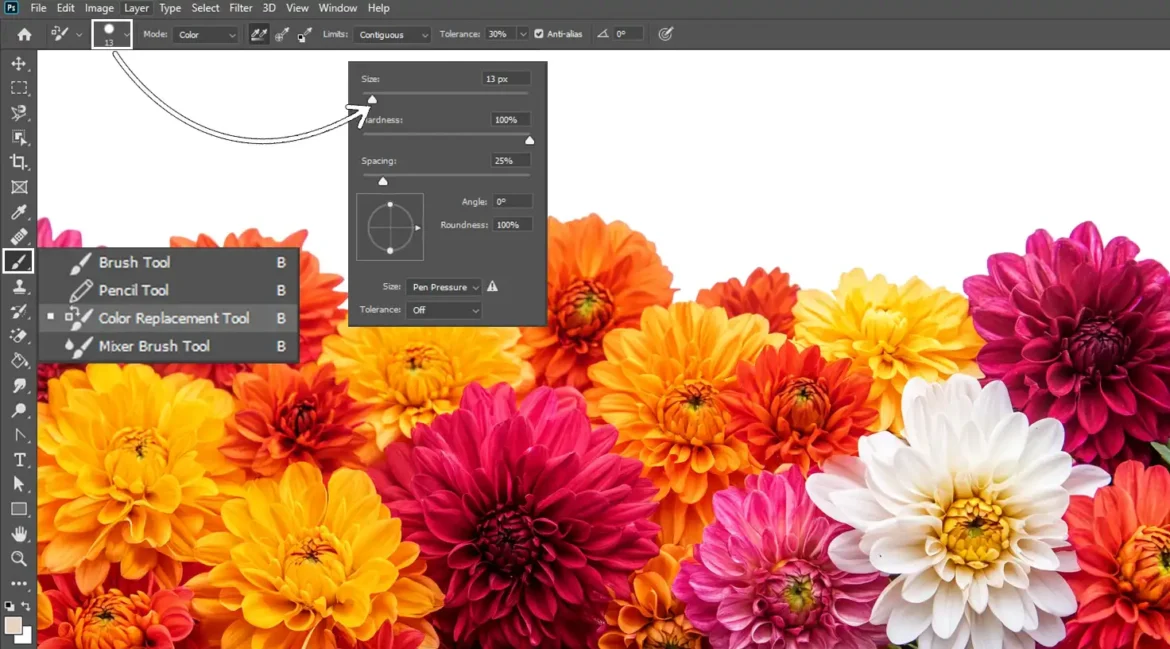
The Replace Color tool is incredibly useful for editing intricate areas. It allows you to change specific parts of an image with great precision.
- Adjust the brush size in the Options Bar to fit your needs.
- Make sure the Sampling options are set to the correct mode.
This tool helps you focus on specific sections without affecting the entire image, making it ideal for replacing colors in detailed areas.
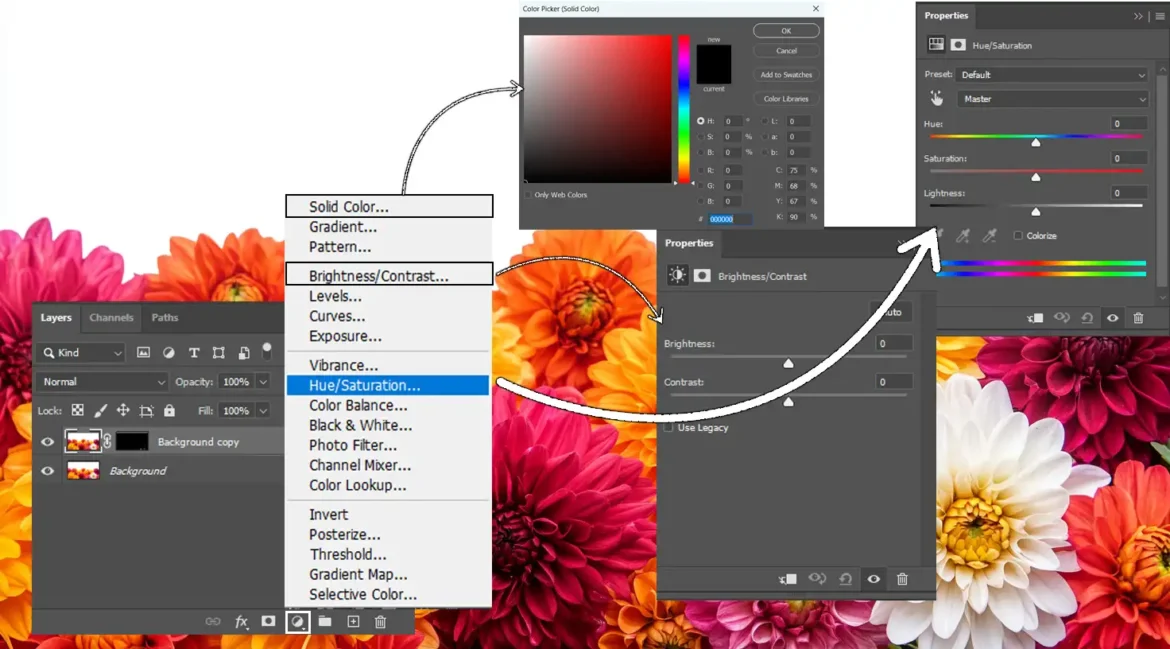
Working with an Adjustment Layer
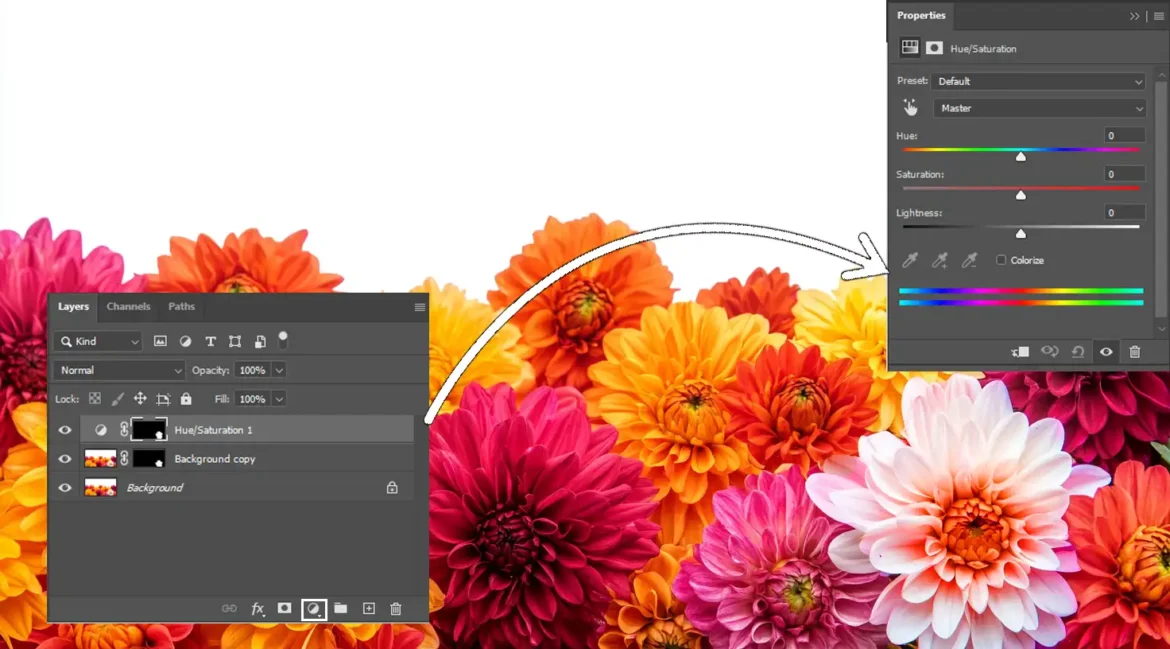
Adjustment layers preserve the original pixels, making them ideal for non-destructive edits and future adjustments.
- To add a new adjustment layer, click the Adjustment Layer icon in the Layers Panel and select options like Hue/Saturation to modify hues.
Using layer masks allows you to control exactly where the changes apply, providing flexibility based on the needs of your project.
Pro Tip: Learn how to change the color of a layer in Photoshop and discover the shortcut for creating new layers to save time and avoid issues.
Tips for Precise Color Adjustments For accurate color modifications in Photoshop, keep these key tips in mind to ensure smooth and precise changes:
To make precise adjustments, use the Eyedropper Tool to select the existing color. This helps maintain consistency across your changes.
- Fine-tune the results by adjusting the fuzziness slider.
- For smoother transitions, experiment with different blending modes. Test various combinations to achieve the best effect.
- Use the Hue/Saturation sliders in the adjustment layer to make subtle yet impactful changes.
Pro Tip: Keep an eye on the histogram panel to monitor the color balance throughout the image and ensure optimal results.
Mastering Adjustment Layers
Mastering Adjustment Layers in Photoshop
Adjustment layers in Adobe Photoshop unlock endless creative possibilities. They allow you to modify your image without affecting the original, giving you complete freedom to experiment.
There are different types of adjustment layers, each offering unique functionality:
- Hue/Saturation Adjustment: Think of this as the “DJ” of your colors, giving you precise control over hue, saturation, and lightness. If an object in your image feels dull, this is your tool to give it new life.
- Brightness/Contrast: This tool adds some extra “pop” to your images by adjusting brightness and contrast, making everything stand out like popcorn in a microwave.
- Solid Color and New Fill Layer: These layers let you add a solid color to your image, perfect for creating backgrounds or bold color overlays. They make changing an object’s color quick and easy.
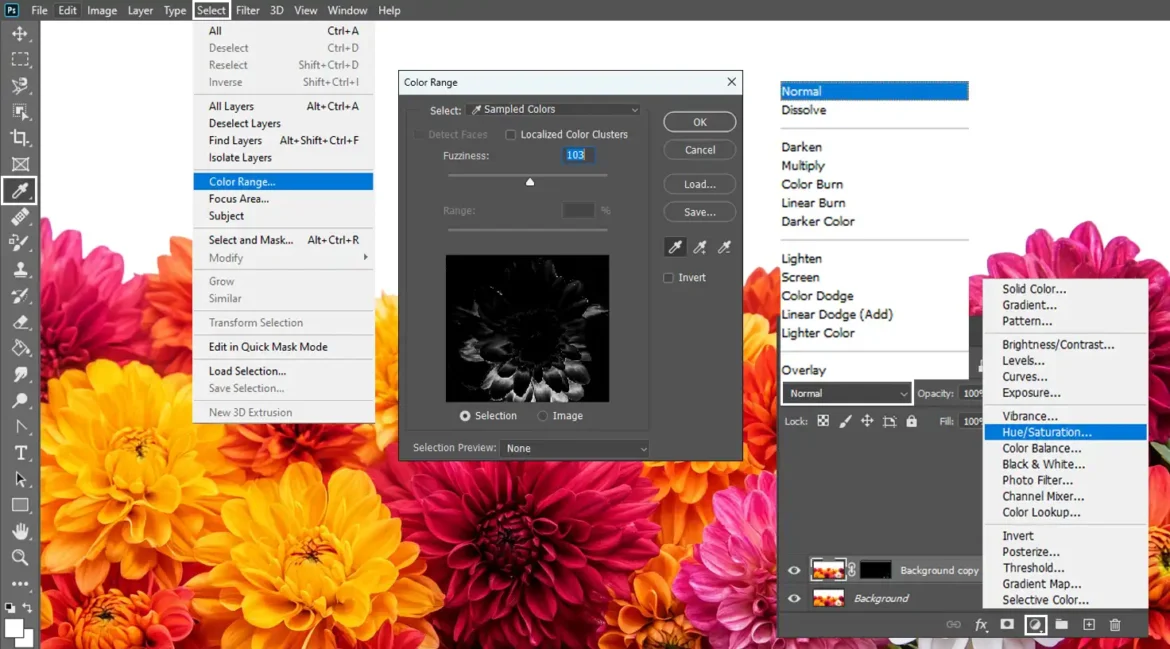
Creating and Applying Adjustment Layers
Creating adjustment layers is simple. Just go to the Layers Panel in Photoshop, click on the Adjustment Layer icon, and select from a variety of options to fit your creative needs.
To apply a Hue/Saturation adjustment, move the sliders to fine-tune your colors. Use the Eyedropper Tool for precise color selection and watch the transformation unfold. You can also change the foreground color or dive into the color picker for even more customization.
For a more adventurous approach, try using a Solid Color adjustment layer.
Pro Tip: Learn how layer color swapping works to simplify this process and save time.
Adjustment Layer Best Practices
To get the most out of your adjustment layers, a little patience and practice go a long way. Here are some tips:
- Avoid overloading your image with too many layers—too many adjustments can make it look cluttered or chaotic.
- Use the colorize option carefully. It can unify different elements in your image but may overpower the overall look if overused.
- When replacing colors, focus on localized color clusters for more accuracy and better results.
- The Brush Tool is your ally for smooth transitions or correcting small areas. Use it to fine-tune each detail.
- Lightness sliders are essential for achieving a natural, balanced look in your image. Get the right balance, and your image will feel warm and inviting.
- Lastly, experiment with the Replace Color Tool, color replacement, or blending modes to add variety and uniqueness to your edits.
With these tips and tricks, you can easily navigate Photoshop’s adjustment layers and take your edits to the next level!