Realistic Shadows Made Easy: Tips for Better Depth in Composites
So, you’ve just cut out a subject, placed it in a brand-new background, adjusted the lighting—and yet something still feels… off. Chances are, it’s the shadows.
Realistic shadows are the glue that holds a composite together. Without them, even the sharpest cutout will feel like it’s just floating above the scene. The good news? Photoshop in 2025 gives us better tools than ever to fake depth and make it stick. Here’s how to do it the smart (and easy) way.
Why Shadows Matter So Much
Shadows tell our brain a lot about how objects interact with light, space, and surfaces. When they’re wrong or missing:
- The subject looks disconnected from the background
- The lighting feels unnatural
- The image loses realism—even if everything else is technically “right”
Good shadows are subtle, layered, and directionally consistent. Let’s walk through how to make them in Photoshop the right way.
1. Understand the Types of Shadows
Before you start creating, know what kind of shadow you need:
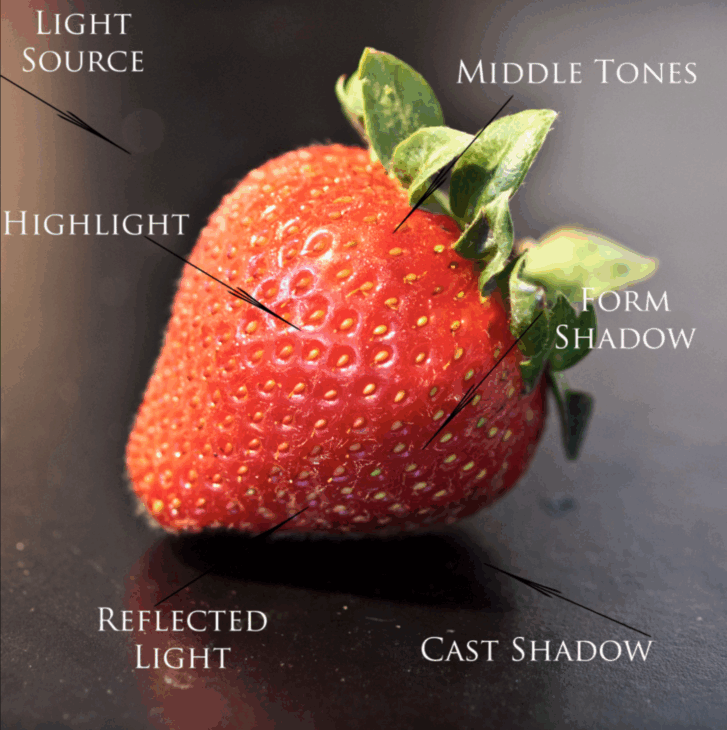
- Contact Shadow: A small, tight shadow directly under where the object touches a surface. It’s darkest and sharpest closest to the object.
- Cast Shadow: The shadow projected by the object onto another surface. It’s longer and softer, and direction depends on your light source.
- Ambient Shadow: A soft shadow all around the object caused by indirect lighting. Often overlooked, but it helps ground the subject.
Use these together for believable depth.
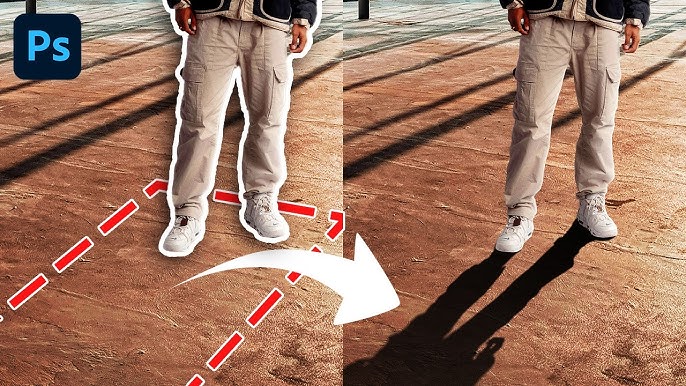
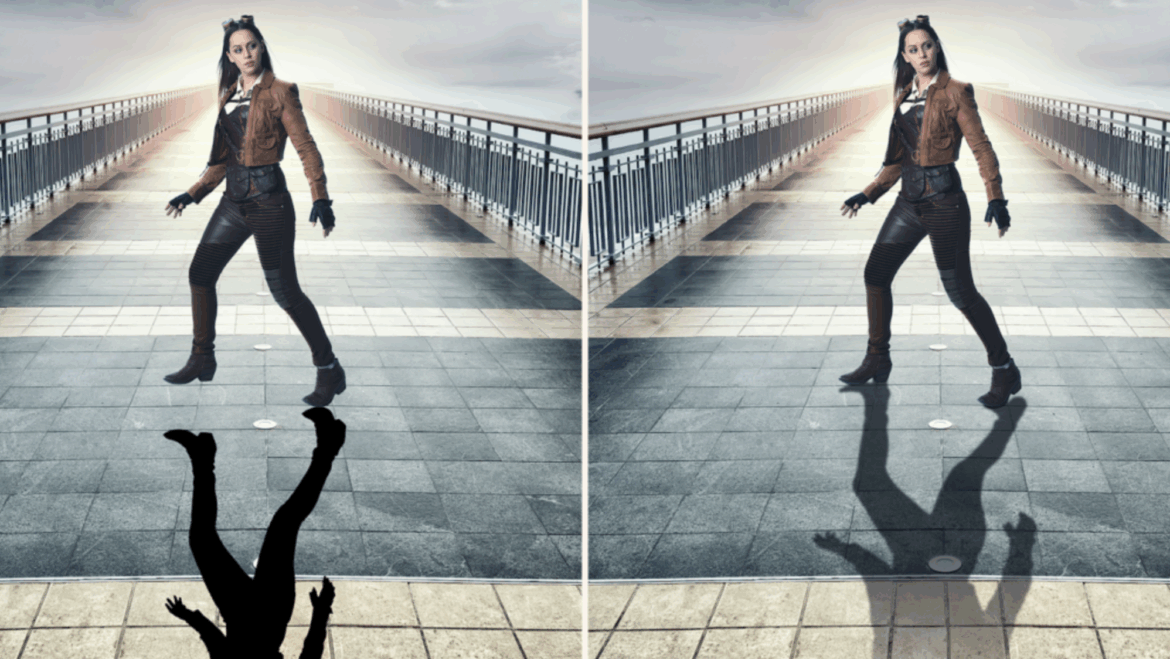
2. Use Shape + Blur for Fast Cast Shadows
Here’s a tried-and-true method for creating cast shadows manually:
Step-by-step:
- Duplicate your subject layer.
- Fill it with black (Image > Adjustments > Hue/Saturation > Lightness: -100).
- Transform it (Edit > Transform > Distort or Perspective) to stretch it across the surface.
- Apply Gaussian Blur – adjust based on distance from the object.
- Lower the opacity (usually 30–60%) and set to Multiply blend mode.
This combo works well for placing people, objects, or furniture into scenes.
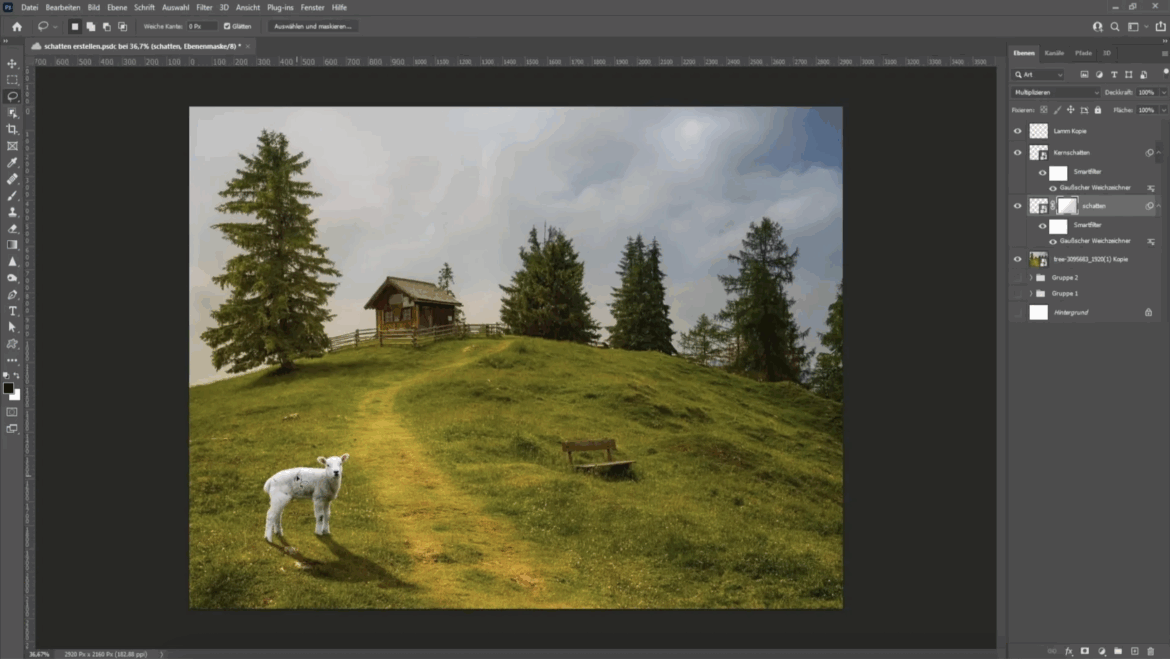
3. Try the New 2025 Contextual Task Bar for Fast Mask Refinement
If you’re casting a shadow and need it to taper off naturally, Photoshop’s Contextual Task Bar (introduced in 2024 and improved this year) helps you quickly:
- Feather a mask edge
- Fade the shadow from dark to light using gradients
- Isolate complex shapes with Refine Mode
Use this bar while working on your shadow layers to clean them up in seconds.
4. Add Ambient Shadows with Gradient Layers
Ambient shadows are especially important in studio-style composites. To fake one:
- Create a new layer below your subject
- Select the Elliptical Marquee Tool and make a soft oval
- Fill with black or dark neutral gray
- Apply a strong Gaussian Blur (50–150px)
- Reduce opacity to around 15–30%
Tip: Slightly offset the shadow to match your main light direction.
5. Use Layer Styles for Quick Drop Shadows—But With Caution
Photoshop’s built-in Drop Shadow effect can be helpful, but it’s not always the most realistic. If you use it:
- Set Distance to match your scene’s lighting
- Reduce Spread and use soft Size
- Change the shadow color to a warm or cool gray instead of pure black
Better yet? Convert the Drop Shadow to a Layer (Right-click > Create Layer) and edit it manually.
6. Use Smart Objects to Preserve Flexibility
Wrap your subject and its shadows into a Smart Object so you can:
- Resize and reposition everything together
- Add extra adjustments (blur, gradient map, etc.) non-destructively
- Reopen the object later for tweaks without rebuilding
7. Use Real Reference Shadows
If you’re unsure how the light would cast, grab a reference photo. Study how shadows fall from similar shapes and light angles. You can even paste one in your document as a temporary guide.
Final Thoughts
Realistic shadows are part science, part art—but they don’t have to be complicated. With just a few layers, a blur or two, and a little attention to direction and softness, your composites can go from “photoshopped” to photorealistic.
Whether you’re doing product mockups, creative portraits, or cinematic edits, investing a few extra minutes into shadow work will always pay off.
Try some of these techniques in your next project and see how much more grounded and believable your work becomes.